Translate to another language

Wednesday, August 24, 2011

Well I'll be darned!!! It's a mandolin!!


If you got here looking for the Siminoff Lutherie Camp photo essay just click on the 2009 entries link on the left side of this page expand the October entries and you will be jumped to that part of the web log ... or just scroll down and you'll see them ...


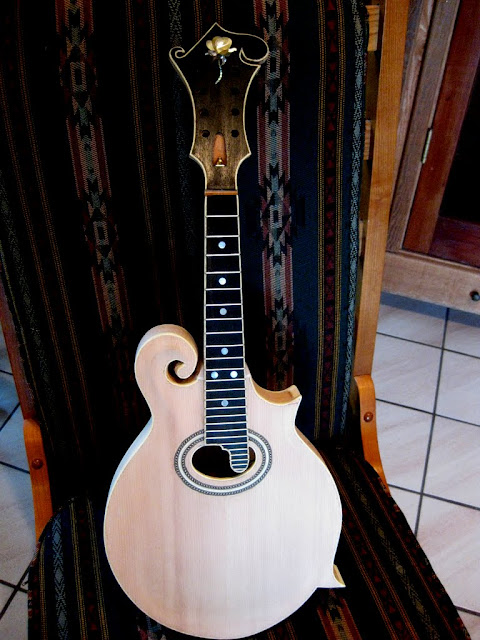
So ... after only 22 months ... it's a mandolin!!!  


Truth be told it's been a mandolin for some while now but I hadn't done the setup and actually put strings on it until tonight ... no real excuse other than life getting in the way ...

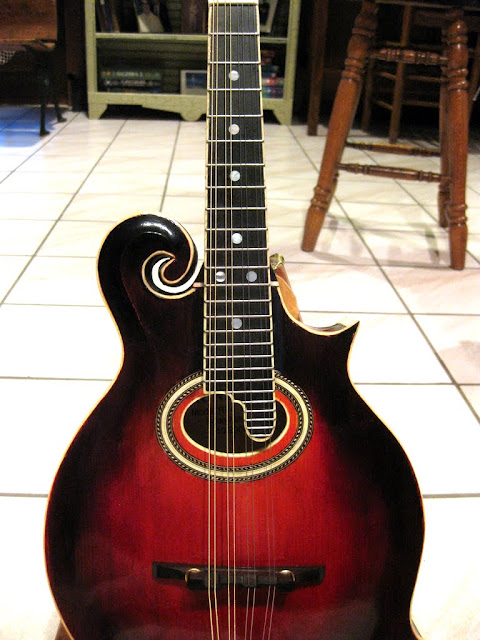
Regardless, I decided tonight was the night so I dug out my nut files and rooted around until I found a pack of D'Addario J62 strings ... these are pretty light gauge but I knew I wanted a more mellow tone from this instrument AND I really hate stringing up mandolins ... I'm always sure I'm going to pop one of those high E strings and put my eye out ... kinda like a Red Rider BB gun at Christmas!

I filed the nut slots to approximation and the bridge saddle slots (I used an adjustable bridge rather than the older non-adjustable bridge that I think was more traditional on the F4's because I really didn't know what the setup was going to be like).  I had previously fit the bridge foot to the body.  I guessed at the location for the bridge and put the strings on ... heard the first notes of the voice and was impressed by the ringing volume this instrument has.

I completed the string-up, made several adjustments on the location of the bridge to get the intonation "pretty close" (I'll dial it in really close after it's had time to stretch the strings a bit) and played a couple of tunes.

The action is really very good with these J62's ... might be a teensy bit high if I J72's on it but none of the frets buzz, it frets cleanly further down than I will ever play and has a pretty pure sound to my tin ear.

So ... a few pictures ... and at some point I'll try to post an MP3 clip of the sound.


From Lutherie

From Lutherie

From Lutherie

Gotta show that YELLOW ROSE OF TEXAS !!!

From Lutherie

Hope you enjoyed the long long journey from Roger Siminoff's first ever Lutherie Camp to the completion of this instrument ... thanks for looking in!!

Bade

Friday, July 22, 2011

"Rub a Dub Dub ..." ... or ... gettin' my shine on ...

If you got here looking for the Siminoff Lutherie Camp photo essay just click on the 2009 entries link on the left side of this page expand the October entries and you will be jumped to that part of the web log ... or just scroll down and you'll see them ...


I'm getting close to the end now ... at this rate I'm afraid lutherie as a 2nd career isn't in the cards ... completing one instrument every two years or so probably wouldn't pay the bills ...

The following photos are after the I applied 13-15 coats of Tru-Oil, allowed that to cure for 9 days and then spent a couple of hours rubbing the finish with Behlen's Deluxe compound and Ming #11 polish. What I believe this shows is that a Tru-Oil finish can definitely provide a very high gloss finish if that is what you are after. In this particular case I could have done better with the underlying wood finish but honestly when one of these things sits around the shop unfinished for over 18 months you get a few dings you simply fail to notice until it's pretty much too late. Oh well ... live and learn ...

One note here ... I should have done a step before applying dye to enhance the grain in the quilted maple ... truth be told I simply forgot until it was way too late. So ... the quilted maple grain SHOULD be a little more defined than it is ... a fault of my skipping that step not the Tru-Oil finish.


So ... the story so far ... 


... and the BACK STORY ...


Next is to install the hardware, do the set-up and see what kind of voice it has ... 


Tuesday, July 5, 2011

Dying to burst onto the music scene ... or ... hoping to scrape by ...

If you got here looking for the Siminoff Lutherie Camp photo essay just click on the 2009 entries link on the left side of this page expand the October entries and you will be jumped to that part of the web log ... or just scroll down and you'll see them ...


The whole business of trying to stain an acceptable sunburst is a bit like making chili ... you throw stuff in the pot, stir, taste, add some more stuff, stir, taste, add some more stuff to counter the last stuff you put in that turned out to be too much, stir, taste, and repeat and repeat and repeat until at some point the magic happens (at least to your satisfaction it happens) and all of a sudden you're finished ... so to speak ... at least that is the way it is for me ... I've only done a few sunburst finishes but it always seems like it's an iterative process of adding stain, removing stain, over and over again until it 'seems right' ...

So I started with the back figuring if I screwed it up completely I could always go for a black back and sides ...

From Lutherie

Once I was satisfied with the back ... I decided to go the "full monty" and plunged ahead with the rest ... the photos below are after all stain was applied and the masking tape was removed ... it is evident that I have NOT done the scraping of the binding ... that is the next step and one I do not look forward to ... BUT I can say doing at least SOME masking of the binding was a huge improvement over not doing it ... next time I will likely spend much more time on the masking step and try to get it all .. I really recommend this!!.

So without further ado ... stained and unmasked ...

From Lutherie

From Lutherie

From Lutherie

From Lutherie

This would be the "butt burst" I suppose ...

From Lutherie

Overall I'm pretty happy with the result so far ... next a lot of scraping and color touch up ... then a coat or two of shellac to seal ... and then the Tru-Oil finish process ... did I mention I hate to scrape binding!!!????

Sunday, July 3, 2011

We who are about to dye salute you ... or ... a slacker's confession ...

If you got here looking for the Siminoff Lutherie Camp photo essay just click on the 2009 entries link on the left side of this page expand the October entries and you will be jumped to that part of the web log ... or just scroll down and you'll see them ...

It's true ... it's been about 18 months since my last confession ... errrr ... my last work on the F4 mandolin I started way back in October of 2009 at Roger Siminoff's Lutherie Camp ... what can I say ... I've done lots of other things ... I retired for one ... then took a really extensive vacation with some friends through Great Britain and Ireland ... rebuilt several antiques, built a really nice greenhouse for the wife ... OK OK ... it's true ... I was avoiding the hand work of cutting the binding notch around the scroll ... so shoot me ... I just didn't want to face it ...

But I have ... and it was about as miserable as I remembered ... but just like everything else .. if you just suck it up and face the music ... it can be done ...

Here's a shot of the way I strapped the binding on the top during the glue set ..
From Lutherie

I put several pegs in the scroll opening to pin the binding ... I'm, fortunate on the F4 that there is only a single layer of binding which alleviates the nastiness of getting the miters just right ...

From Lutherie

After the glue has dried and a bit of rough sanding ...

From Lutherie

From Lutherie

The back has some really nice figure in the quilted maple ...

From Lutherie

From Lutherie

So ... I sanded ... and sanded ... and sanded some more ... down to 500 grit ... and then I decided that to avoid as much binding scraping as possible ... because I really hate to scrape binding ... I got some automotive striping tape and masked off as much as I could ... I might have been able to do more but decided that it was a trade off of time spent masking or scraping and stopped at the point I thought it was a toss up ...

From Lutherie

From Lutherie

This whole "hole" (oval sound hole that is ... business with a rosette) has been a real issue for me during this build and I hope this masking job will suffice ... worry worry fret fret ...

From Lutherie

So ... next step is to apply the sunburst dye job ... I've done it before so I am more confident than I probably have a right to be ... this will be a traditional for the F4 "red sunburst" ... as my friend Chris has said ... "a sunburst finish can hide a LOT of mistakes" ... I'm counting on it!!!

Tuesday, March 22, 2011

A return to Mr Wizard's Workshop ... Tools and Fixtures camp with Roger Siminoff

If you got here looking for the Siminoff Lutherie Camp photo essay just click on the 2009 entries link on the left side of this page expand the October entries and you will be jumped to that part of the web log ... or just scroll down and you'll see them ...

This past weekend (3/19/2011, 3/20/2011) I had the good fortune to attend Roger Siminoff's first "Tools and Fixtures" camp.  This is a short two day camp where Roger demonstrates the many different tools, fixtures, fasteners, jigs and so on that he uses to fashion the parts of his mandolin, mandola and banjo parts. 

This camp is much different than the week long "building" camps Roger offers.  In this camp,  the curtain is pulled all the way back and any and everything is open for discussion regarding the fabrication of parts.  The focus is on "how to visualize and build a fixture or jig" to get you from the "part needed" point to the "part in hand" stage.

There are many salient points of discussion such as:

When it is appropriate to construct a fixture or jig and when it is better simply to make the part "one off".

What materials are appropriate for jig and fixture construction.

What tools should one have in the shop.

An overview of the camp can be found on Roger's site at this link look at camp "D"

I believe this camp would be of great value to the luthier interested in building for sale.  In my case I build as a hobby without any aspiration to sell my instruments but I wanted to try an get a handle on the "creative process" Roger goes through when he plans and constructs a jig or fixture.  I got some terrific insight into this process and while it would be impossible for Roger to "teach" the creativity he has for jig and fixture building, just seeing the process, understanding the possibilities and getting a better handle on how I might go about doing it was well worth the entry fee.

I was joined at this camp by three of my previous camp mates as sort of a mini-reunion and we were happy to have a new camper join the fold.  Welcome Mack and Carl, Mike and Annette it was great to see ya'll again!!

I'll only post a couple of pictures below since many of the jigs and fixtures "look alike" although when you see them in action you quickly come to understand their unique function and construction.

This is the pin router setup that Roger uses for the fabrication of many parts:

From Lutherie

One of the many jigs/fixtures that uses a bottom bearing router setup:

From Lutherie

A "smart" jig used to fabricate the critical intonation cuts in a mandolin bridge saddle:

From Lutherie

A look at the bottom bearing router setup with a jig that will be used to fabricate the bridge foot:

From Lutherie

All in all another great experience ... if you have an interest in learning about "jigs, tools and fixtures" used in lutherie ... I don't think you can find a better resource!