Translate to another language

Tuesday, January 12, 2010

Binding with The Beatles ... or ..."jumping off the ledge..."

If you got here looking for the Siminoff Lutherie Camp photo essay just click on the 2009 entries link on the left side of this page and you will be jumped to that part of the web log ... or just scroll down and you'll see them ...


OK ... here's the deal ... cutting the "binding ledge" or "binding notch" is one of those tasks that I suspect most luthiers have obsessed over more than once. It's kinda like what a car enthusiast might go through when contemplating serious body work on his or her prized ride ... it probably has to be done but you really don't want to start and then discover you've botched the job! People are gonna notice, point fingers and snicker behind your back! It isn't that the task hasn't been completed successfully thousands of times by countless individuals ... it's that now it's your turn and people are watching!!

Added to this already "clinched posterior" circumstance is the realization that the instrument I am about to attack with a motorized, wood eating, razor sharp, madly spinning power tool, is one that I have significant funds and time invested in and it could all go very South in the blink of an eye ... Basically I had driven over three thousand miles round trip to attend a class taught by the recognized world expert of F style mandolin construction at an appreciable monetary cost and investment of personal time and effort and am now faced with the very real possibility of instantly turning the cherished result of that investment into a small pile of firewood that wouldn't produce enough heat to successfully roast a marshmallow. No pressure at all big fella ...

So I turned on my MP3 player in the shop blasting The Beatles Mono remaster collection at a volume that would drown out both the high speed whine of the laminate trimmer and my pounding heart and proceeded to set the mandolin in the carriage I had fashioned ...

Ooops ... problem number 1(geeze ... already???) ... I had decided to route the back of the mandolin before the top for a couple of reasons ... I wanted to put off routing on the top that people would most often see as long as possible and I wanted to get a little more 'experience' with the jig (on real wood) before dealing with the soft spruce of the top where I anticipated likely tearout problems around the points. The problem is ... unlike say a dreadnought guitar or an A style mandolin for example that is the same shape looking at the top or the bottom an F style mandolin is not symmetric! ... you might THINK I had already noticed that but apparently while mentally thinking about using the jig for the last several months ... it never crossed my mind! ... So ... first I need to make a carriage for the back side (or I could have just turned the first carriage I made over and drilled appropriate mounting holes but since I had the "dummy" body blank I just decided to press it into service since it was otherwise of no other value).

So here are the "twins"" ...

From Lutherie

And I'm happy with the backside result ... the following several pictures show various views of where the binding notch for the back has been routed with the TrueChannel jig ... I have also pointed out where I could go no further with the routing jig because either the attached neck was in the way or the pilot bit setup I used was the limiting factor ... so obviously some tedious benchwork hand cutting will be required.

From Lutherie

From Lutherie

This is as far as I can go on the scroll with the jig ...

From Lutherie

Happily I didn't get any tearout on the points on the back!
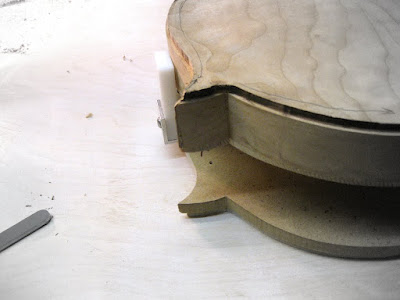
From Lutherie

So ... the back is done as much as I can do with the jig ... and I'm happy with the result! Now ... it's time to crank up the Beatles a little louder and dive into the task on the top ... aaaaggggghhhh ....
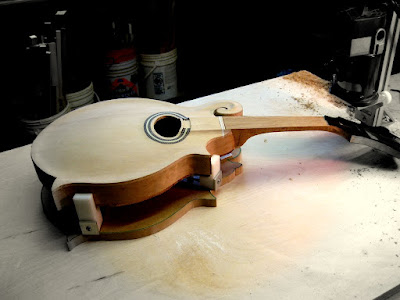
From Lutherie

A look before cutting at how the mandolin sits on the jig ...

From Lutherie

As far as I will be able to go on the top as well ...

From Lutherie

... and some views of the results ...

From Lutherie

No tearout!!! Yea!!!!

From Lutherie

From Lutherie

As far as I can go on this part ... hand work to follow ...

From Lutherie

and that pesky scroll area ... some long hours at the bench await ....

From Lutherie

So ... whew!! I am very glad that particular ordeal is over ... I still have some significantly difficult work ahead of me around the scroll top and back AND I still have to route the binding ledge on the headstock which will not be done with the TrueChannel jig but another fixture altogether and I will document that in another posting.

As far as the TrueChannel jig itself ... I have to say that it works exactly as advertised and is seemingly made of quality materials. I would like to see a little closer tolerance on the "sliding" rollers and the tower but it seems to work fine as is ... as far as the "carriage" I fashioned that myself with no real difficulty. The leveling/height adjustment mounts were well made and easily installed on the carriage. It took me longer to 'seat the mandolin in the jig' and get it level and "tight" than I expected but it was worth the time investment because once I had it set it seemed very stable and easily moved around the jig table.

I would definitely suggest cutting the binding ledge before gluing on the neck if at all possible ... I think I could have gotten further in the scroll area had that been my situation. I also believe that with a little different cutter bit setup I could get even further into the scroll and will experiment with that before my next build.

So ... much more tedious work to come but really only one more task (headstock binding) left to do with a power tool ... please tune in again ...

Monday, January 11, 2010

Learning a new jig ... or ..." we need to make mandolins out of MDF !!!"

If you got here looking for the Siminoff Lutherie Camp photo essay just click on the 2009 entries link on the left side of this page and you will be jumped to that part of the web log ... or just scroll down and you'll see them ...


Well if it hasn't been obvious I'll tell you a small secret ... I've been avoiding the binding task like I avoided the H1N1 flu!!! My previous binding experience on the StewMac F5 I built in 2006 was traumatic and I'm pretty sure damaged my psyche for life. It's simply NOT a pleasant experience in my mind ... the binding on an F5, particularly around the scroll and headstock is the first place I look to determine the craftsmanship with which the instrument was built. A sharp, clean scroll with tight even binding is a thing of beauty ... it's why F style mandolins (assuming of course they sound good!) are so much more expensive than A style mandolins ... the carving of the scroll, the difficulty of artistic binding are things that take incredible patience and skill to master and when done by a master are obvious marks of quality. At this point in my lutherie efforts I aspire to be an "average or better student" ... "journeyman skills" are several builds down the road but I am enjoying the journey!

So ... since I received the TrueChannel jig for Christmas I had procrastinated to the point where action had to be taken. My thought was to fashion a "dummy" mandolin body just to run thru the jig to see if there were any obvious trouble spots ... now a couple of important points here ...

1 - I used MDF for the dummy .. MDF has no grain ... basically it's "paper" ... and as such it routes very cleanly with essentially no danger of tearout. Not the case at all with spruce, maple or other typical woods one would use to make a mandolin. That being the case this testing will not reveal any trouble spots in that regard.

2 - The MDF is FLAT ... as in NOT CONTOURED like the body of an F style mandolin. But, in fairness that is one of the touted advantages of this jig ... "the contour isn't supposed to effect the routing because of the 'floating' nature of the jig ...". So ... if we believe the premise then we can at least "tell ourselves" that this won't hide any real trouble spots ... I'm TRYING to believe that ... really I am!!

3 - This test is on a dummy blank with NO NECK attached ... unlike the F4 I started in camp with Roger. I believe that future builds I do I will choose to route the binding ledge BEFORE attaching the neck ... that's the way I do it with guitars and it seems to me to give me much more movement freedom than having the neck attached ... but regardless, the F4 I'm building DOES have the neck attached and I'll deal with it when the time comes. That is one suggestion I need to make to Roger for future camps .. consider finding a way to cut the binding ledge in camp ... I understand the time constraints Roger and his team are working under to get a mandolin "in the white" finished in just under five days but the the difficulty of the binding ledge has lead to several anxious emails between us Class #1 campers discussing the task and how we wish it could have been done "under supervision".

So enough rambling ... this posting will only be the testing of the TrueChannel jig and not the actual cutting of the ledge on the F4 ... I will save that for another posting! Kinda like a "cliff hanger on TV" ain't it ???

This is the body blank I fashioned ... showing the direction of the cuts I would make on an actual "wood" body ... it took me quite a bit longer to fashion the dummy body and attach it to the jig than it did to do the actual routing!!!

From Lutherie

A shot showing how I fashioned the dummy to sit up on the carriage of the jig ...

From Lutherie

I decided a little baby powder would make the movement of the carriage around the board smoother ... it worked fine!!

From Lutherie

Almost slipped up here ... it is important to have clearance around the whole body on the jig ... since this "dummy" is considerably 'thinner' than a real mandolin body I discovered I needed to raise it up a bit (the jig provides leveling screws that make this easy) to clear the pilot bearing set screw...

From Lutherie

Time to rock and roll!!! When the "real moment" comes ... I'm gonna be sweating bullets!

From Lutherie

Drum roll .... and in about 3 minutes it was basically all over but the shouting ...

From Lutherie

Close up around the scroll area ....

From Lutherie

How far I could go on the scroll ...

From Lutherie

Easily around the heal cap treble side ...

From Lutherie

These next few pics show where I would CONSIDER stopping to avoid tearout ... I MIGHT risk the climb cut indicated by the arrows just to see if I'm having a lucky day ... on MDF as will be obvious ... it isn't an issue since there is no grain ...

From Lutherie

From Lutherie

From Lutherie

see why we should make mandos out of MDF ...

From Lutherie

From Lutherie

This is a close as I could come with the pilot ...

From Lutherie

... and just a couple of shots of showing that the binding would lay in this channel very nicely ... just dry fit of course ...

From Lutherie

From Lutherie

From Lutherie

So ... that would be "the test" ... at this point and taking into account the things that I know are "different" from the real thing I have to say I am encouraged! ... It LOOKS like this jig works as advertised and although I fully expect some difficult benchwork ahead on this task I think this will be "better than the last one ..." (he said hopefully and with just a smidgen of trepidation ... )

I have at this point also inlaid the headstock ornamentation and will reveal that as soon as the glue dries and I have it sanded down to my satisfaction ...

We return you now to your regular programming ...