Translate to another language

Saturday, January 9, 2010

Ring around the Rosette Bush ... or "Oval is harder than Round !!"

If you got here looking for the Siminoff Lutherie Camp photo essay just click on the 2009 entries link on the left side of this page and you will be jumped to that part of the web log ... or just scroll down and you'll see them ...


I have to say ... when I decided to build an F4 vs an F5 at the Siminoff camp, ONE of the things that drew me to that decision was what I considered the simple beauty of the oval soundhole on the F4 mandolin vs the "f holes" on the F5 style ... I have 3 mandolins with "F holes" as it is and wanted to change things up a bit .. and I had read that the F4's have a more mellow less "cut through" sound than the F5 ... of course that is what the F5 is designed to do! Regardless once Roger said it was OK for me to do an F4 at camp that beautiful oval soundhole surrounded by that elegant multi-layer rosette was often on my mind as the camp approached.

Now I was fully aware that I couldn't use the same techniques to cut the channel for an oval hole that I had employed on several steel string acoustic guitars I had built in the past ... heck those were easy ... slap a cutter in a jig on a drill and in a couple of minutes ... viola!! a perfect round channel for the inlay! I hadn't REALLY thought this whole "oval thing" through though ... basically ... "there ain't no jig!" ... you may dance a jig while you cuss the effort ... you may play a jig while contemplating how you are going to recover from your most recent disastrous effort of cutting the oval channel but ... I could find no good "jig" to ease the task.

The following couple of pictures were taken while still at camp as I discussed the upcoming ordeal with Roger ...

From Lutherie

From Lutherie

... now the instructions that come with the rosette (purchased from Roger) are pretty clear and simple ... basically 'trace the outline of the rosette on the soundboard and cut to fit ...' ... uh-huh --- I built a banjo once from a kit and the instructions for that were pretty simple too --- "Open Box, remove contents, assemble banjo..." ... pretty much the same thing here ... no real mention of "the best way to carve out the channel..." or ... "watch out when you do this ... because ... you aren't gluing into a dark wood like ebony where you can hide poor craftsmanship with colored glue .... " ... oh no ... here you are cutting a channel for a fixed size piece of inlay that will be laid in a basically "white" spruce soundboard ... so ... have a nice time buddy cause you only get one shot ...

I'm not the most skilled "carver" on the planet ... and the intimidation of knowing I wanted to keep the soundboard basically light toned in color (perhaps a sunburst haven't decided yet) coupled with the "arch" of the soundboard and lack of any helpful jigs has made my workbench life fairly miserable for the last couple of weeks as I tried one thing and then another ... some I'm not willing to reveal due to their complete failure and obvious poor choice ... but after all is said and done if you don't look too close!! the result is "acceptable" but by no means as good as I had in my early visions of F4 bliss ... so ...

Here we have the effort early in the game and one of the tools I used to do much of the work ...

From Lutherie

... there's already storm clouds brewing at this point ...

From Lutherie

I was feeling KINDA OK at this point but the fit is already not "perfect" ...

From Lutherie

Ahhh yes ... the whole "how do I glue this thing ??? " question ... this was one of several dry fit glue configurations I tried ...


From Lutherie

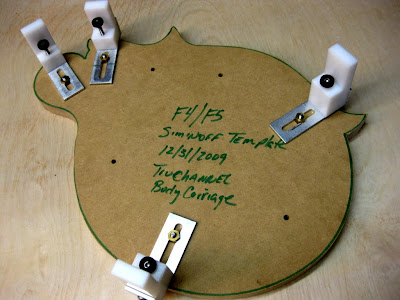
... and even after I had settled on one clamp scheme that SEEMED to be reliable ... when I put the wax paper under the cauls ... all "heck" broke loose and clamps, and cauls were sliding all over the place ... and NOT holding a darn thing ... and of course by that time I was gluing for real ... regardless I "... danced a jig while cussing the whole situation ..." (at least I suspect it LOOKED like I was dancing as I was racing around the workbench trying to figure out how in blazes I was going to get the clamps to hold!!) ...

I did FINALLY get it clamped as best I could but there was some significant "less than perfectness" to deal with afterward ...

From Lutherie

So ... after "playing a jig" or 10 ... and sanding ... and trimming ... and a bit of witchcraft and magic ... I ended up with ...

From Lutherie

It doesn't bear real close examination and I'm hoping to hide a few flaws with creative finishing ... but ... it is what it is ...

Now on to laying in the headstock decoration ...

Sunday, January 3, 2010

Setting up the TRUECHANNEL Binding Jig for a mandolin F style ...

If you got here looking for the Siminoff Lutherie Camp photo essay just click on the 2009 entries link on the left side of this page and you will be jumped to that part of the web log ... or just scroll down and you'll see them ...

As I hoped, my wonderful wife of 36+ years gifted me with a Stewart McDonald "TrueChannel" binding jig for Christmas ... it pays to hint and email with links!!

I got the #5651 setup since I can build my own carriage and already have the appropriate cutter bits.  So my task was to assemble the jig and get a feel for how it may or may not work on an F style mandolin ... the following pictures show the setup I made.  A later post after I have had a chance to experiment on some "dummy" blanks will detail any success or failure I have with this jig on the F4.


This is the carriage I made from MDF

From Lutherie

The pieces parts after I assembled them ...

From Lutherie

Normally I would not have the neck attached before I cut the binding ledge BUT since we attached the necks at the camp with Roger ... I'll deal with it as best I can ...

From Lutherie

Kinda shows the 'gist' of why this works ...

From Lutherie

From Lutherie

From Lutherie

From Lutherie

I set the carriage up so that the top edge of the rim is at 4" all the way around the mandolin ... since the router "floats" and thus keeps the cutter perpendicular to the edge/cut I'm not absolutely sure that is mandatory but it satisfied my ascetic preference if nothing else ...

From Lutherie

From Lutherie

From Lutherie

My initial thoughts (having made ZERO CUTS at this point) are that the jig is well engineered and made of quality materials ... tolerances SEEM to be adequate although I personally would like to have seen a slightly closer tolerance on the rollers in the shaft but "movement" is probably only .002" or so.

Once I have done some testing on scrap blanks I'll post more detail.

Some progress on F4 after returning home from Siminoff Camp ...

First I want to say how pleased and surprised I am at the number folks that have viewed my web log here since I posted the "dailies" while at Roger Siminoff's Lutherie Camp in October 2009.  I set up a simple counter after I got back home and to date (since the counter was initiated) the site has been visited over 635 times and by people in 14 different countries!  Clearly Roger is getting some well deserved interest in the camp and has fans across the globe.  One slight disappointment for me is that not one of the visitors has chosen to leave me a comment ... it's easy to do just click on the word "comments"  at the bottom of any day's posting and let me know what you think, why you visited or just say "Hi"!!

So if you linked here specifically looking for the photo essay I did on the Siminoff camp just scroll further down to the October entries ... it's all there and it was a blast!!

Now, since I got back home my work on the F4 has been sporadic ... the first thing I did was fret the board that we had bound at camp.

Here is a picture of the frets I cut oversized (length) and laid out so that I could trim the tangs to fit over the binding.

From Lutherie

To trim the tangs I used a modification of a technique Roger showed us ... I took a scrap block of wood and cut a groove in it that fit the tang of the fretwire moderately tight and then attached a cutoff wheel on my Dremmel tool and slipped the fretwire just over the edge of the block and in about two seconds per end was able to cleanly trim the tang flat ... it didn't take but one fret to realize those suckers get HOT during this little operation and a glove was called for!!

From Lutherie

I made a point of using a granite backboard when I seated the frets because I wanted a clean strike and seat ... worked like a champ!

From Lutherie

Once a fret was "set" I "seated" them with a flat iron strike ...

From Lutherie

This is what the frets look like hanging over the edge of the binding before I trim and profile them ...

From Lutherie

From Lutherie

The finished fretboard will show up in later posts ... the next step will involve the TrueChannel binding jig I received for Christmas and then getting the Rosette channel cut and the Rosette laid in ...