
OK ... here's the deal ... cutting the "binding ledge" or "binding notch" is one of those tasks that I suspect most luthiers have obsessed over more than once. It's kinda like what a car enthusiast might go through when contemplating serious body work on his or her prized ride ... it probably has to be done but you really don't want to start and then discover you've botched the job! People are gonna notice, point fingers and snicker behind your back! It isn't that the task hasn't been completed successfully thousands of times by countless individuals ... it's that now it's your turn and people are watching!!
Added to this already "clinched posterior" circumstance is the realization that the instrument I am about to attack with a motorized, wood eating, razor sharp, madly spinning power tool, is one that I have significant funds and time invested in and it could all go very South in the blink of an eye ... Basically I had driven over three thousand miles round trip to attend a class taught by the recognized world expert of F style mandolin construction at an appreciable monetary cost and investment of personal time and effort and am now faced with the very real possibility of instantly turning the cherished result of that investment into a small pile of firewood that wouldn't produce enough heat to successfully roast a marshmallow. No pressure at all big fella ...
So I turned on my MP3 player in the shop blasting The Beatles Mono remaster collection at a volume that would drown out both the high speed whine of the laminate trimmer and my pounding heart and proceeded to set the mandolin in the carriage I had fashioned ...
Ooops ... problem number 1(geeze ... already???) ... I had decided to route the back of the mandolin before the top for a couple of reasons ... I wanted to put off routing on the top that people would most often see as long as possible and I wanted to get a little more 'experience' with the jig (on real wood) before dealing with the soft spruce of the top where I anticipated likely tearout problems around the points. The problem is ... unlike say a dreadnought guitar or an A style mandolin for example that is the same shape looking at the top or the bottom an F style mandolin is not symmetric! ... you might THINK I had already noticed that but apparently while mentally thinking about using the jig for the last several months ... it never crossed my mind! ... So ... first I need to make a carriage for the back side (or I could have just turned the first carriage I made over and drilled appropriate mounting holes but since I had the "dummy" body blank I just decided to press it into service since it was otherwise of no other value).
So here are the "twins"" ...
 |
| From Lutherie |
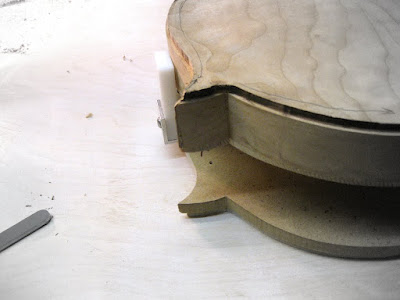
And I'm happy with the backside result ... the following several pictures show various views of where the binding notch for the back has been routed with the TrueChannel jig ... I have also pointed out where I could go no further with the routing jig because either the attached neck was in the way or the pilot bit setup I used was the limiting factor ... so obviously some tedious benchwork hand cutting will be required.
 |
| From Lutherie |
 |
| From Lutherie |
This is as far as I can go on the scroll with the jig ...
 |
| From Lutherie |
Happily I didn't get any tearout on the points on the back!
 |
| From Lutherie |
So ... the back is done as much as I can do with the jig ... and I'm happy with the result! Now ... it's time to crank up the Beatles a little louder and dive into the task on the top ... aaaaggggghhhh ....
 |
| From Lutherie |
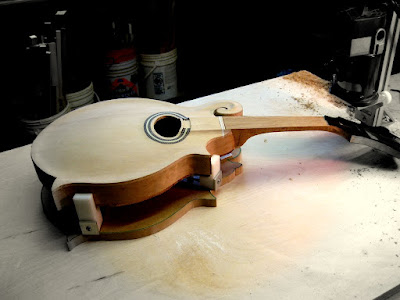
A look before cutting at how the mandolin sits on the jig ...
 |
| From Lutherie |
As far as I will be able to go on the top as well ...
 |
| From Lutherie |
... and some views of the results ...
 |
| From Lutherie |
No tearout!!! Yea!!!!
 |
| From Lutherie |
 |
| From Lutherie |
As far as I can go on this part ... hand work to follow ...
 |
| From Lutherie |
and that pesky scroll area ... some long hours at the bench await ....
 |
| From Lutherie |
So ... whew!! I am very glad that particular ordeal is over ... I still have some significantly difficult work ahead of me around the scroll top and back AND I still have to route the binding ledge on the headstock which will not be done with the TrueChannel jig but another fixture altogether and I will document that in another posting.
As far as the TrueChannel jig itself ... I have to say that it works exactly as advertised and is seemingly made of quality materials. I would like to see a little closer tolerance on the "sliding" rollers and the tower but it seems to work fine as is ... as far as the "carriage" I fashioned that myself with no real difficulty. The leveling/height adjustment mounts were well made and easily installed on the carriage. It took me longer to 'seat the mandolin in the jig' and get it level and "tight" than I expected but it was worth the time investment because once I had it set it seemed very stable and easily moved around the jig table.
I would definitely suggest cutting the binding ledge before gluing on the neck if at all possible ... I think I could have gotten further in the scroll area had that been my situation. I also believe that with a little different cutter bit setup I could get even further into the scroll and will experiment with that before my next build.
So ... much more tedious work to come but really only one more task (headstock binding) left to do with a power tool ... please tune in again ...
Hi Bade,
ReplyDeleteIt looks great! That's about as far as I've seen anyone else go before they had to whip out the chisels... Nice work!
-Mike
Bade, I must say, this is the first time I've seen either the Stew-Mac or LMI binding setups used on a mandolin. Looks like it worked well.
ReplyDeleteIf there's a downside to using the bearing-equipped cutter sets, it's that they pull up fibres and leave a ragged edge, even when they're brand new. Some guitar builders substitute a follower of their own and a spiral downcut router bit - leaves a perfectly clean cut. Of course, this requires that several passes are taken in order to guarantee consistency in the width of the binding channel. It's all about compromises!
Hi Peter! You are of course correct that the "rabbett cutters" leave that little fiber edge that has to be sanded or otherwise removed. What we need is a spiral downcut bit with a pilot bearing setup ... but I've not seen such a handy thing.
ReplyDeleteI checked out your web site ... beautiful work indeed!
Bade
Bade, thanks for checking out my blog. I gave up on my first F5 years ago when it came to binding the body - there was a sorry lack of information in those pre-internet days, particularly down here in Australia. I've built quite a few guitars since, however, and might even complete an F5 soon - attempt number 2! Hats off to anyone who successfully builds these things - it's a far greater challenge than a guitar. I'll be sure to check out your progress from time to time.
ReplyDelete